Use this topic to learn the objects on the SmartCare main page. The information provided in this topic includes:
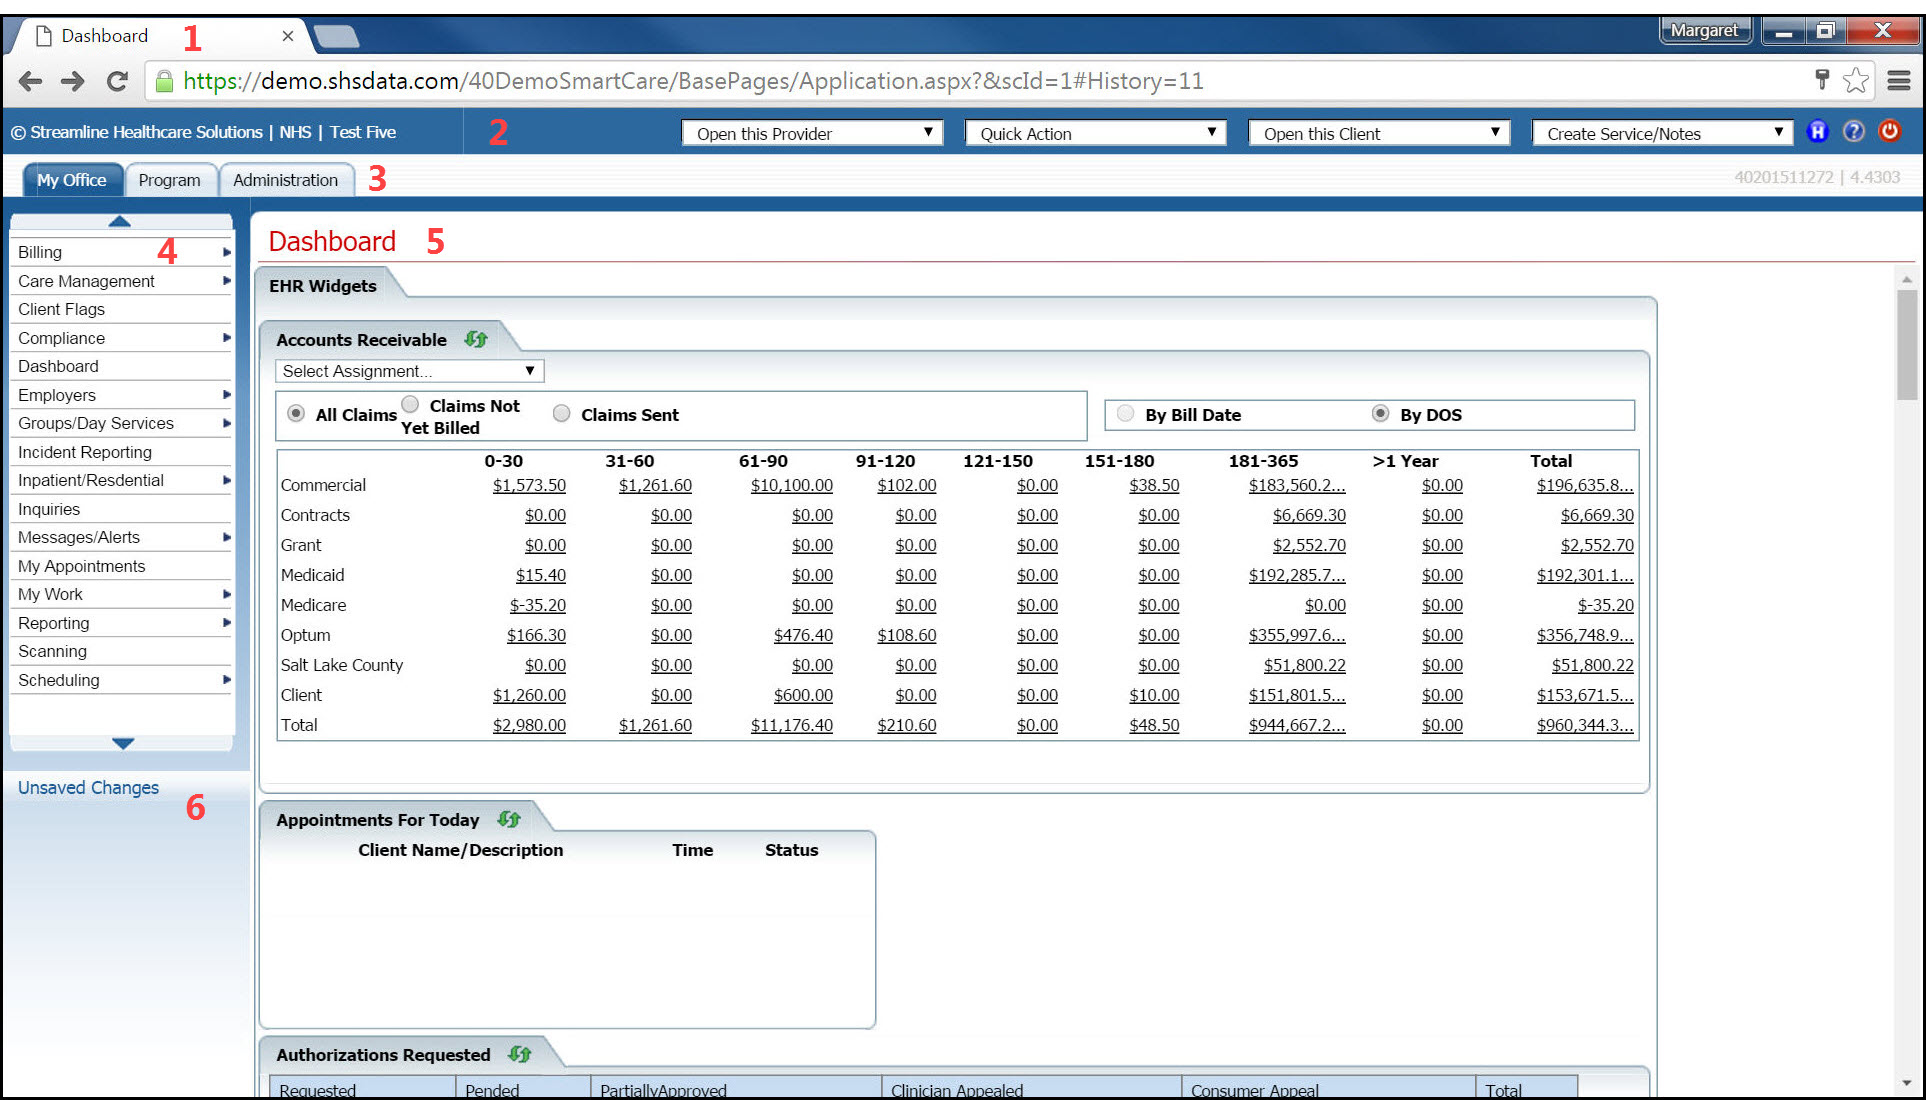
The SmartCare main page appears as shown below. This page appears when you sign on and is called the Dashboard..

The call out numbers on the figure above define for you:
|
Number |
Description |
For More Information |
|
1 |
The browser bar showing navigation arrows and the URL of the page. The URL identifies the system environment you are working in. |
|
|
2 |
Title bar showing the copyright logo, your company's name and the user's sign on name. The bar also providers quick drop down options to let you quickly access important areas of SmartCare. |
|
|
3 |
Identifies the tabs. The dark blue tab is open and the menu banners are listed in the column below (section numbered 4). Click on a tab to display that tab's menu banners. Additional tabs can be open as you work. These additional tabs include:
|
|
|
4 |
Menu banners. Click on a banner to open that module in the system. Notice the right-pointing blue arrowheads. These indicate that there is a list of sub-banners. The menu banners change when a different tab is selected above (section numbered 3). | |
|
5 |
The area on our sample page above identifies the area where the software screens are displayed. This is where you make your selections and enter data. Pop-up windows are also displayed in this area. | |
|
6 |
This area denotes Unsaved Changes. The system provides a list of pages where data was changed or entered, but the page was not saved before you navigated from that page. You can click on the hyperlinked name of the page and finish the work you were doing. The system will save this work for 168 hours before deleting. When you first sign on to the system, a message is displayed that lets you know there are unsaved changes and gives you the option of Discard Changes or Review Later. |
![]()
The Menu Bar appears below the browser screen title bar in the browser screen. The drop down boxes are QuickLinks that provide access to common actions.
A tool bar appears on every page in the system. It is located to the right of the page's title.
![]()
The figure above shows the toolbar that appears on the Bed Census list page. Notice there are six icons on this task bar. Not all pages will have this many icons and some may have more.

Shown above is a sample of the tool bar with the most common items. Listed below is a description of most of the tool bar items you see throughout the system.
|
Toolbar Items |
Description |
|
Bed Search |
Displayed on the Bed Census list page. Use the toolbar item to search for a bed based on the filters you set on the page. |
|
Close page |
Closes the page and returns to the previously displayed page. |
|
Close software |
Displayed on the Title bar. Use this toolbar item when you are ready to sign off and close your session in SmartCare. |
|
Delete page |
Displayed on certain pages, such as the Inpatient Activity Details page. Use to delete the action displayed on the page. |
|
Export |
Exports the data in the body of a list page into an Excel spreadsheet. |
|
Favorite |
Click to display a list of hyperlinked list of favorite pages and windows you marked as favorites. Click the link to display the page or window. |
|
Help |
Displayed on all SmartCare pages. Use to display the help for the specific SmartCare page. |
|
Help |
Displayed on all SmartCare pages on the Title bar. Use this to display the entire SmartCare help system. Useful for searching for all content, not just the content for the current page. |
|
History |
Displayed on the Title bar. Use to view all the pages you have accessed in this session in the sequence accessed. Click the tool to return to a specific page. |
|
Information |
Hover over the toolbar item to display information about the client whose information is shown on the page. View the information pop-up window. |
|
New Favorite |
Sets the currently displayed page as a favorite. Click the New Favorite tool and complete the pop up window. Type a name for the page or window. Click OK. |
|
New item |
Creates a new entry for the page that is displayed. For example, if the Authorizations page is displayed, clicking the toolbar item displays the Client Search screen so you can create a new authorization for a client. |
|
Save button |
Displayed on data entry pages, such as the Inpatient Activity Details page. Use to save your work. |
|
Spell Check |
Displayed on the Inpatient Activity Details page. Use to check the spelling of any text entered in free-form comment fields you completed on the page. |
|
View Attendance |
Displayed on the Bed Census list page. Use the toolbar item to display the Bed Attendance report. |
![]()
The tabs appear on the upper left portion of the main page in SmartCare just below the title bar. The currently selected tab is darker blue. In this figure, the My Office tab is selected. This means that the My Office banners are displayed below.
| Tab | Description |
|
My Office |
Displays the banners for completing tasks in the system set up for the business. |
|
Client Name and ID number |
Displays the banners for completing tasks for a specific client. This tab is only displayed if a client is selected. Identifies the client who is selected and the client ID. To close the tab, click the X in the tab. Note that when a client tab is open, many screens will display information specific to that client, until you close the tab. |
|
Utilization Management |
Displays the links to access Program Assignments and Track Assignments. |
|
Program |
Displays banners for viewing and managing program assignments and tracking those assignments. |
|
Administration |
Displays the banners for setting up and managing the SmartCare software specifically for the business. The configuration and set up information defined in this tab control how the processes, jobs and many keystroke tasks work in SmartCare. |
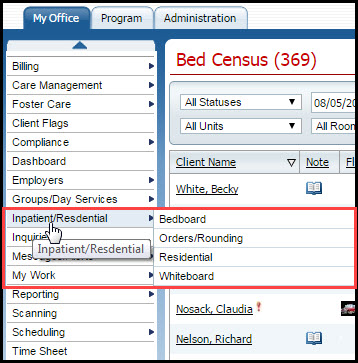
The tasks and work you accomplish in SmartCare are organized into groups. Each line in the figure below represents a group of tasks which are related to the banner. For example, the first line represents all the Billing tasks. Each line is referred to as a banner.
To open the page connected to the banner, hover the cursor over the line and left-click the mouse. If there is a right-pointing arrow on the banner (notice that Billing has a right-pointing arrow), a drop down menu is displayed where you can choose other related options. If you want to open one of these tasks, hover the cursor over the task on the drop down menu and left-click the mouse. The lines on the fly-out menu are referred to as sub-banners.
For example in the images below, when you hover the cursor over the Inpatient/Residential banner, the sub-banner list is displayed (refer to the red box outline in the second figure below). Move the cursor over the sub-banner you want and left-click the mouse to select it.


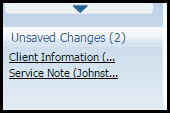
If you have left pages where you entered or changed data and did not save the page, SmartCare holds onto the changes. These pages and screens are held to give you an opportunity to save the changes. The pages/screens that need to be saved are listed in the Unsaved Changes section. The Unsaved Changes section is displayed just below the banners section on the left side of the screen.
Click on the page listing in the Unsaved Changes section. The page is opened so you can finish and save the changes..

Version 1.1 November 2016